 Remote Desktop
The Remote Desktop connection (based on Microsoft RDP ActiveX) can be used to connect to remote computers or Hyper-V guests using the remote desktop protocol (RDP) which is built into Windows.
Dashboard
The Remote Desktop Dashboard is shown in the Dashboard panel when you select a Remote Desktop connection in the Navigation panel. Depending on the Hyper-V configuration of your connection you will either see the Hyper-V dashboard pane, the Sessions dashboard pane, or both.
Hyper-V Features
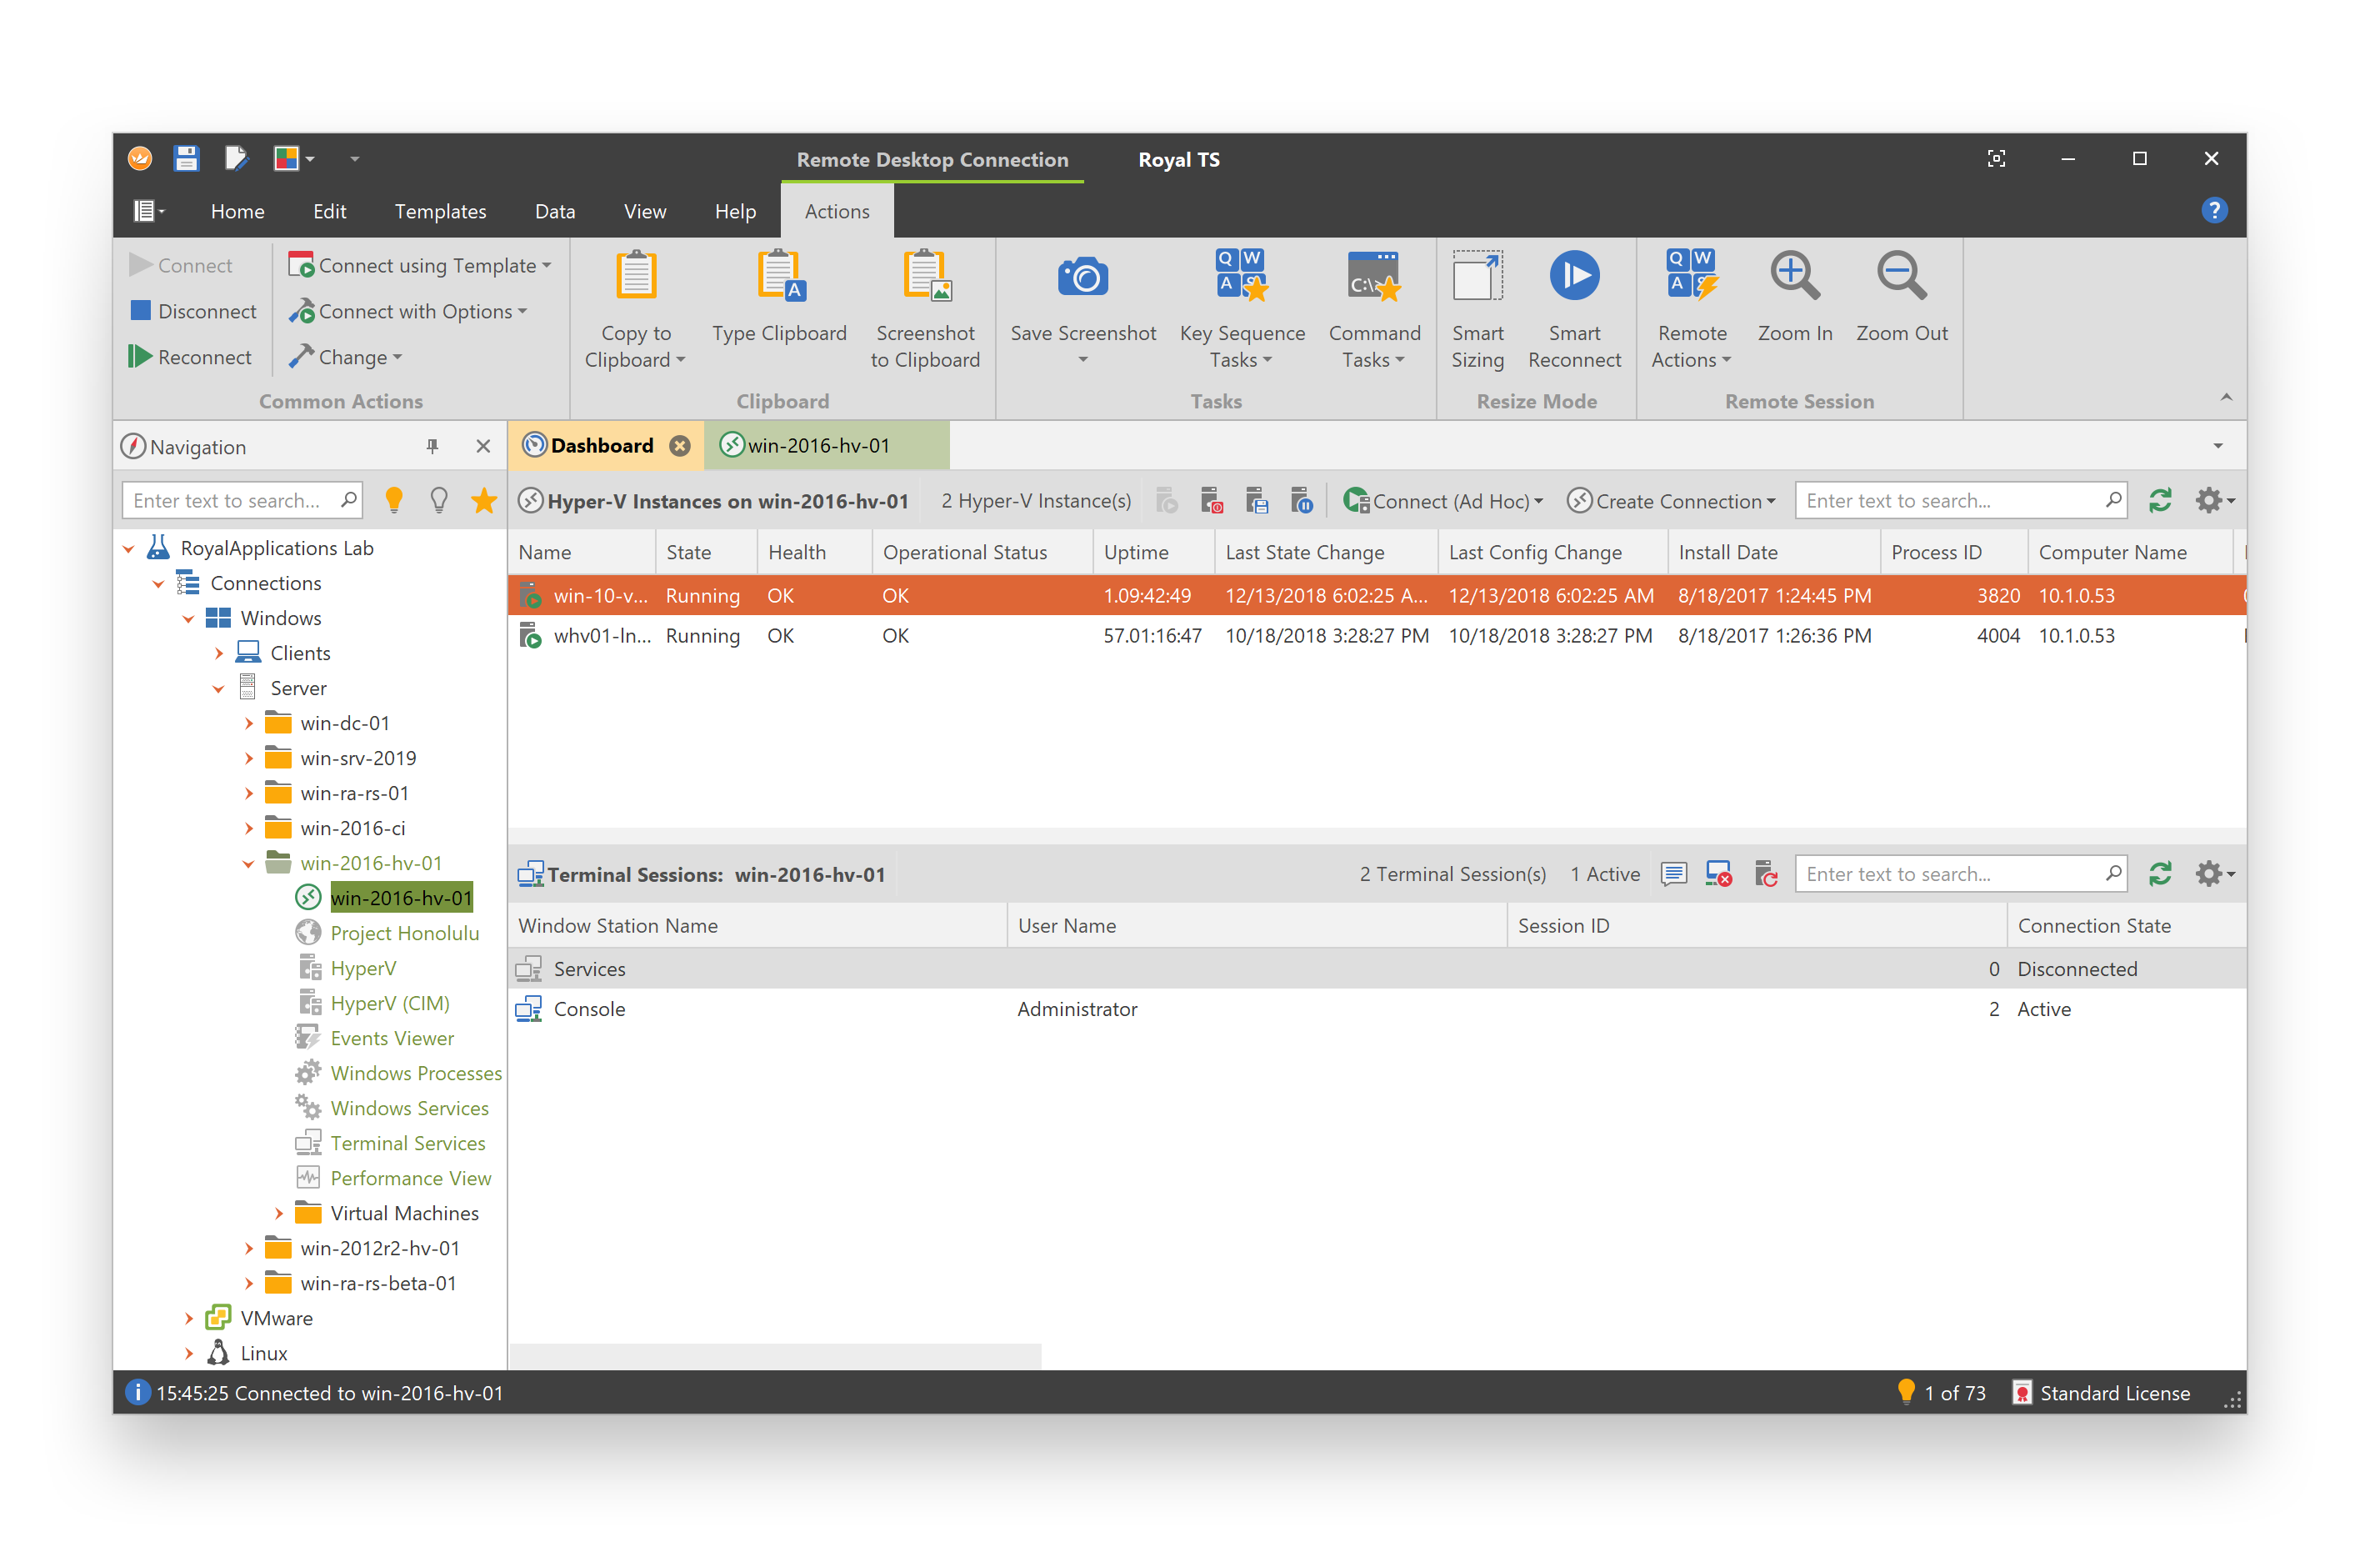
- List of all hosted Hyper-V guests (or instances) and their state.
- Grid search and customization, including sort, filter and group.
- Start, Pause, Save State and Shut Down Hyper-V guests directly from the Dashboard.
- Add a new Remote Desktop connection based on the original settings combined with the guest properties.
Royal TS assumes the guest name as the host name for the new connection. - Add a new Hyper-V Instance connection based on the selected guest.
Royal TS creates a new Remote Desktop connection configured to connect directly to the Hyper-V guest. - Connect (Ad Hoc) allows you to connect directly to the selected Hyper-V guest.
Important
The Hyper-V dashboard pane relies on WMI. Ensure that all the necessary firewall ports for WMI are open and that the user account running Royal TS (beware of UAC) or the credentials set in the Remote Desktop connection have local administrative rights on the remote Hyper-V host computer.
Sessions Features
- List of all terminal services sessions and their state.
- Grid search and customization, including sort, filter and group.
- Send a message to appear on the desktop of the selected remote session(s).
- Reset a selected remote session (similar to a forced log off).
- Restart the remote server.
Important
The Sessions dashboard pane relies on RPC communication. Ensure that all the necessary firewall ports for RPC communication are open and that the user account running Royal TS (beware of UAC) have local administrative rights on the remote computer.
Royal Server Support
The dashboard data can also be gathered using a Royal Server. For more information about Royal Server, click here.
Dashboard Settings
To configure the application default settings for the included dashboard, open the Plugins Management and click on Dashboard for the Remote Desktop plugin.
To configure individual dashboard settings for a connection, use the Dashboard property page.
Plugin Settings
To configure the Remote Desktop plugin settings, open the Plugins Management and click on Settings for the Remote Desktop plugin:
Client Version
Specify which RDP client version should be used. If Automatic (Default) is selected, the latest version available will be used.
Use Microsoft Remote Desktop Client
If checked, Royal TS will try to use the modern Microsoft Remote Desktop client from the Microsoft Store. Ensure the client is installed before enabling this setting. A restart is required.
Disconnect and Reconnect
Fast Smart Reconnect
If checked, Royal TS will use the faster reconnect method introduced in RDP 8 whenever possible. Disable this setting in case you experience issues with smart reconnect.
Force Smart Reconnect on all Sessions
If checked, Royal TS will invoke smart reconnect on all sessions as soon as it is invoked on one. Disable this setting in case you experience issues with smart reconnect.
Close tab when user logs off, reboots or disconnects
If checked, Royal TS will also close tabs when a log off, reboot or disconnect from within the session is initiated.
This setting is only effective when Keep tabs open when disconnected remotely in the User Interface option is checked.
Auto Reconnect on Disconnected Tab
If checked, the automatic reconnect feature will be enabled when the disconnected tab is shown.
Always Reconnect
If checked, the automatic reconnect feature will always be enabled when the disconnected tab is shown, including events like signing out the remote session or rebooting the remote computer.
Show Overview Thumbnails
If checked, thumbnails are shown in the Overview tab.
Advanced
Set Domain to '.' for Local Accounts:
If checked, a dot ('.') will be used as domain for local account user names if no domain is specified.
Disable Click Detection
If checked, Royal TS will not be able to detect clicks inside a remote session. This should only be used for troubleshooting.
Connection Properties
The Remote Desktop Properties dialog is shown:
- for a new Remote Desktop connection by clicking the Remote Desktop menu item in the Add drop down menu in the Edit group on the Home ribbon tab.
- for an existing Remote Desktop connection by selecting a Remote Desktop connection and clicking on the Properties command in the Edit group on the Home ribbon tab.
- as a bulk-edit dialog when multiple Remote Desktop connections were selected in the Folder / Document Dashboard and the Properties command in the Edit group on the Home ribbon tab is clicked. See also: Bulk Operations
Remote Desktop Properties
Display Name (required)
Enter a display name for object.
Color
Click the color picker button in the display name text box to select a color. In the User Interface settings you can configure to show the color in the navigation tree, the connection tab or as connection border.
Icon
Click the icon picker button next in the display name text box to select and assign a custom icon to the object.
Computer Name (required)
Enter the computer name or the IP address.
Tip
Click on the browse button (...) to open the Entry Editor dialog. The entry editor can be used to search for computers in your network and to add multiple entries for different servers with the same settings at the same time (when supported).
Alternatively, you can also just specify more computer names by separating them with a semicolon for bulk-add operations.
Replacement tokens are supported.
Port
Specify the TCP port for the remote desktop connection. The default RDP port is 3389.
Console/Admin Session
Similar to the /console or /admin switch from the original terminal services client (mstsc.exe).
Description
Enter a description for the object.
MAC Address
Use this optional field to record the remote computer's MAC address. You can then use this field in templates or tasks, like a wake-on-lan task, for example.
 Display Options
Color Depth
The color depth (in bits per pixel) for the control's connection.
Note
Higher color depth needs more bandwidth. If you are working with slow connections, reduce the color depth.
Desktop Size
Select one of the predefined desktop sizes or specify your own desktop width and height.
Scale Factor
Select the initial remote desktop scale factor. Older clients or servers may not support desktop scaling
- Automatic
Automatically set scale factor. - Custom percentage
Manually set scale factor.
Local Zoom
Can show Scroll Bars in the remote session when zoom level has changed.
Resize Mode
Configure how Royal TS handles session window resize events.
- Scroll Bars
Decreasing the window size will show scroll bars in the remote session. - Smart Sizing
Decreasing the window size will scale down the remote session. - Smart Reconnect
Changing the window size will force a reconnect, so that the remote desktop will adapt to the new size.
Note
Keep in mind that a large desktop size and high color depth drastically increases memory usage of Royal TS - especially when you connect to many servers at the same time.
 Credentials
The Credentials page allows you to assign a credential to the object. You can specify username and password, assign a predefined credential or you specify a credential by name (ideal when you share your configuration). You can also use the credentials defined in the parent folder.
Do not use any credentials
When selected, no credentials are configured for the object. Connections that require credentials may prompt to enter credentials or fail to connect.
Use credentials from the parent folder (not always available)
When selected, Royal TS will look for a configured credential in the parent folder.
Note
Not available for Royal Server objects, Secure Gateway objects, Remote Desktop Gateway objects and Key Sequence Tasks
Use from this connection (not always available)
When selected, the username and password is used from the context connection object.
Specify username and password
When selected, a username and password can be provided. For domain accounts use the syntax "domain\username" (without the quotes).
Use an existing credential
When selected, assign an existing credential to the object using the drop-down list. Use the add button to add a new credential. Use the edit button to edit the selected credential.
Tip
The drop-down list supports sorting and filtering "as you type" to easily find the correct credential.
Specify a credential name
When selected, enter or choose a credential name you want to assign to the object during connect-time.
If you enter '?' (without the quotes) as credential name, Royal TS will prompt for credentials by showing the credential picker dialog.
Note
Assigning a credential by name is recommended when a team of users share the same configuration file. Each user can define his own credential as long as it is using the same name and saves the credential in his own personal and protected document. This makes sharing files across team members very easy while keeping credentials safe.
Omit Domain
When checked, Royal TS will omit the domain portion of the username (domain\username or username@domain).
Note
The Omit Domain checkbox is not available for all object types!
Automatic Logon
When checked, Royal TS will use the credentials to log on to the connection automatically. This setting applies only to connection types supporting automatic logon and is ignored if a connection doesn't support automatic logon.
Note
To access the configured credentials through replacement tokens (for example in Auto Fill or Key Sequence Task configurations), use the replacement tokens \(EffeciveUsername\) and \(EffectivePassword\).
Edit Source
Opens the properties dialog of the source object for the configuration. This button will only be available when the object is configured to use the parent configuration.
See also: Working with Credentials, Credential, About shared documents
 Tasks
Tasks
You can specify a task to be executed before a connection is established and after it has been disconnected. For example: establish a VPN connection before you connect and close it after disconnect.
Connect Task
Do not execute a task
Royal TS will not execute a command task when a connection is established.
Use task from parent folder
Royal TS will look for a configured connect task in the parent folder. This option is not available on the document level.
Use an existing task
Choose a command task from the drop-down list. Use the add button to add a new credential. Use the edit button to edit the selected credential.
Note
The drop-down list supports sorting and filtering "as you type" to easily find the task you are looking for.
Specify a task name
When selected, enter or choose a task name you want to assign to the object during connect-time.
Note
Assigning a task by name is recommended when a team of users share the same configuration file. Each user can define his own task as long as it is using the same name and saves the task in his own personal and protected document. This makes sharing files across team members very easy.
Wait for connect task completion
If checked, Royal TS will wait for the selected task to finish before the connection will be established.
Execute for first connection in folder
If checked, the task will only be executed if no other connection in the same folder is active.
Note
This setting might be useful if you need to setup a VPN connection. Put all your connections which require you to setup this VPN in one folder and Royal TS will establish the VPN connection only for your first connection.
Abort when connect task fails
If checked, the connection will not be established when the configured task fails and returns an Exit Code other than 0.
Disconnect Task
Do not execute a task
Royal TS will not execute a command task when a connection is disconnected.
Use task from parent folder
Royal TS will look for a configured disconnect task in the parent folder. This option is not available on the document level.
Use an existing task
Choose a command task from the drop-down list. Use the add button to add a new credential. Use the edit button to edit the selected credential.
Note
The drop-down list supports sorting and filtering "as you type" to easily find the task you are looking for.
Specify a task name
When selected, enter or choose a task name you want to assign to the object during disconnect-time.
Note
Assigning a task by name is recommended when a team of users share the same configuration file. Each user can define his own task as long as it is using the same name and saves the task in his own personal and protected document. This makes sharing files across team members very easy.
Wait for disconnect task completion
If checked, Royal TS will wait for the selected task to finish before the connection will be disconnected.
Execute for last connection in folder
If checked, the task will only be executed if it is the last active connection in the folder.
Note
This setting might be useful if you need to setup a VPN connection. Put all your connections which require you to setup this VPN in one folder and Royal TS will disconnect the VPN connection after the last connection is disconnected.
See also: Working with Tasks, Command Task
 Key Sequence
The Key Sequence page allows you to configure a sequence of key strokes (simulating keyboard events) to be sent to the connection after the connection has been established.
Do not send a key sequence
This is the default value. If selected, no key sequence is sent to the remote session after connect.
Use key sequence task from parent folder
Royal TS will look for a configured key sequence task in the parent folder. This option is not available on the document level.
Specify a key sequence
If selected, a key sequence can be specified for this connection.
Note
Use the fly-out button to the right to show a list of available replacement tokens and special key commands. Use the WAIT command anywhere in the sequence to delay the sequence.
Examples for Key Sequences:
- A group policy is set to show a message whenever a user is attempting to log on interactively. Create a key sequence "{WAIT:1000}{ENTER}" which will wait 1 second (1000ms) after successfully connected to the remote desktop session and sends the ENTER key to the remote session to confirm the message.
- A web page connection to a flash based application which requires you to log on using a username and password can be configured to send the appropriate key sequence after the connection has been established.
Use an existing key sequence task
If selected, a key sequence task can be specified for this connection.
Note
If a key sequence is in progress, do not interact with Royal TS or any other application after you connect. The status bar message indicates when a key sequence is in progress and when it has finished.
Specify a key sequence task name
When selected, enter or choose a key sequence task name you want to assign to the object during connect-time.
Note
Assigning a task by name is recommended when a team of users share the same configuration file. Each user can define his own task as long as it is using the same name and saves the task in his own personal and protected document. This makes sharing files across team members very easy.
Edit Source
Opens the properties dialog of the source object for the configuration. This button will only be available when the object is configured to use the parent configuration.
 Window Mode
The Window Mode page allows you to control where the connection should open. Most connection types support Main Window (Embedded) mode and External Window mode. Remote Desktop connections, for example, additionally support External Window (Full Screen) mode.
Open connection in
- Main Window (Embedded)
When selected, the connection will be embedded in the main window. - External Window When selected, the connection will open in an external window.
- External Window (Full Screen)
When selected, the connection will open in an external window in full screen mode (no window title bar and borders).
Use Multiple Monitors
If checked, the connection will use all monitors if connected in Full Screen mode or if the connection is changed to use Full Screen mode while connected.
Note
This option is only available for connections supporting full screen and multiple monitors (like Remote Desktop).
Don't show the connection bar
If checked, the connection bar will not be shown in full screen mode.
Note
This option is only available for Remote Desktop connections. To display the connection bar, use the Ctrl + Alt + Home keyboard shortcut.
External Window Settings
The following settings can be configured when the window mode configuration is set to external window.
Screen
- Remember Screen
Royal TS remembers which screen the connection was on after you've disconnected the connection and tries to open the external connection window on the same screen the next time you connect. - Screen 1 ... 9
Choose on which screen you want the external connection to be opened.
Note
Setting the Screen configuration to a screen which is currently not available on your computer will be ignored as long as the screen is not available. A common scenario for this is, working with the same file on a laptop computer with only one screen and a workstation with multiple screens connected. Setting connections to open on the Screen 3 will open on the main display on your laptop while the same connection will open on your workstation on Screen 3.
Position
- Remember Position
Royal TS will remember the last window position after you've disconnected the connection and tries to open the external connection window at the same position the next time you connect. - Custom Left and Top
Specify the left and top coordinates (in pixels) where the external connection window should be positioned.
Size
- Remember Size
Royal TS will remember the last window size after you've disconnected the connection and tries to open the external connection window with the same size the next time you connect. - Custom Width and Height
Specify the width and height (in pixels) of the external connection window. - Maximize
The external connection window will be maximized. - Preferred Size
The external connection window will use the sized configured in the connection. This setting will only be effective for connection types supporting a custom client size (for example the Desktop Size in the Display Options of a Remote Desktop Connection). If a connection type doesn't support a custom client size the setting will be ignored and the external window will be maximized.
Minimize Main Window
When checked, Royal TS will minimize the main window after the connection was established.
Open Display Properties
Opens the display properties control panel. With the control panel you can identify your screens.
 Dashboard
The Dashboard page allows you to setup the default dashboard behavior for this connection. Dashboards are updated when a selection has changed. By default, the dashboard tab is shown and activated for inactive connections.
Use the plugin default settings
If selected, Royal TS will use the plugin default settings for the dashboard. You can change the plugin default settings by clicking on the Settings... button. Changes to the plugin default settings will affect all connections using the same plugin and the default settings. See also: Plugins
Use connection specific settings
If selected, Royal TS allows you to configure the dashboard settings for the connection.
Dashboard Settings
Automatically show Hyper-V instances
If checked, the Hyper-V dashboard will automatically retrieve instance information from the remote host.
Automatically show terminal sessions
If checked, the Sessions dashboard will automatically retrieve terminal session information from the remote host.
Use configured credentials
If checked, Royal TS will also use the configured credentials to retrieve the dashboard information if necessary.
 Royal Server
The Royal Server page allows you to configure a Royal Server object for supported connections or choose to use a Royal Server configuration from the parent folder.
Use Royal Server from the parent folder
If checked, Royal TS will look for a configured Royal Server in the parent folder. This option is not available on the document level.
Direct Connect (No Royal Server)
This is the default value. If selected, no Royal Server is used and Royal TS will directly connect to the remote computer.
Specify a Royal Server object
The selected Royal Server object is used for supported connections.
Note
A Royal Server is a product which allows you to gather information and execute management tasks securely on your managed servers.
Edit Source
Opens the properties dialog of the source object for the configuration. This button will only be available when the object is configured to use the parent configuration.
See also: Introducing Royal Server
 Secure Gateway
The Secure Gateway page allows you to configure a Secure Gateway object for supported connections or choose to use a Secure Gateway configuration from the parent folder.
The following object types can be assigned:
- Secure Gateway
- Royal Server
- Azure Bastion Gateway
Use Secure Gateway from the parent folder
If checked, Royal TS will look for a configured Secure Gateway in the parent folder. This option is not available on the document level.
Gateway Usage
- Never
The Secure Gateway is never used and Royal TS will directly connect to the remote computer. - Always
The Secure Gateway is always used and Royal TS will tunnel all communication to the remote computer through the gateway. - On Demand
The Secure Gateway will be used if the target machine cannot be reached directly.
Direct Connect (No Secure Gateway)
This is the default value. If selected, no Secure Gateway is used and Royal TS will directly connect to the remote computer.
Specify a Secure Gateway object
The selected Secure Gateway object is used for supported connections.
Note
A Secure Gateway is a component included in Royal Server and can be used to connect through an SSH tunnel (port forwarding).
Edit Source
Opens the properties dialog of the source object for the configuration. This button will only be available when the object is configured to use the parent configuration.
See also: Introducing Royal Server
 Active Plugin
The Active Plugin page allows you to setup which plugin should be used for this connection.
Use Application Default Setting
If checked, the application default plugin is used for this connection. Clear the check box to configure a specific plugin for this connection.
Click on Open Plugin Management to change the default plugin for this connection type.
Active Plugin
Select the plugin which should be used for this connection.
Information
Click on the information button to open the selected plugin information page.
Settings
Click on the settings button to open the selected plugin settings page.
Open Plugin Management
Click to open the Plugin management dialog.
See also: Plugins
 Advanced
Authentication
Authentication Level
Specifies the authentication level to use for the connection.
- Connect and do not warn me if server authentication fails
No authentication of the server. - Do not connect, if server authentication fails
Server authentication is required and must complete successfully for the connection to proceed. - Connect, but warn me if server authentication fails
Attempt authentication of the server. If authentication fails, the user will be prompted with the option to cancel the connection or to proceed without server authentication.
Network Level Authentication
If the computer you want to connect to requires Network Level Authentication, you need to check this option.
Note
NLA is enabled by default on Vista/Windows 2008 or later.
Use Credential Manager
When checked, Royal TS will create a credential entry in the Windows Credential Manager instead of submitting the credentials to the server.
Restricted Admin Mode
In this mode, credentials won't be sent to the remote server, which can protect you if you connect to a remote server that has been compromised. However, connections made from the remote server might not be authenticated by other servers, which might impact app functionality and compatibility.
Note
Experimental: Microsoft does not provide an official (public) API for setting the restricted admin mode on the ActiveX control Our implementation is experimental. There's no guarantee that it will always work.
Remote Credential Guard
In this mode, credentials won't be sent to the remote server, by sending the Kerberos requests back to the client that wants to establish the connection. Furthermore, it provides single sign-on experiences for Remote Desktop sessions.
Note
This setting will be ignored when Restricted Admin Mode is enabled.
Azure AD Authentication
Determines whether the client will use Microsoft Entra ID to authenticate to the remote PC. In Azure Virtual Desktop, this provides a single sign-on experience.
Note
If the connection can not be established, try changing the username syntax to ".\AzureAD\[email protected]".
Connection
Compression
Specifies whether compression is enabled.
Bitmap Caching
Bitmap caching can improve performance but requires additional memory and disk resources.
Public Mode
When enabled, the RDP client does not cache any data on the local system. Use public mode, for example, when connecting to a business server from a system in a conference center.
Background Input
When background input is enabled the client accepts mouse input even when Royal TS or the external client window is not active.
Session Takeover Warning
When Session Takeover Warning is enabled, the client first checks for terminal sessions and warns the user if a session is already active with the same username.
Use Redirection Server Name
Gets and sets whether to use the redirection server name.
Disable UDP Transport
If checked, the RDP client will not use UDP transport for the connection.
Keep Alive
If checked, Royal TS enables RDP keep-alive behavior for the connection.
Automatic Reconnect
Specifies whether to enable the client to reconnect automatically to a session in the event of a network disconnection. If checked, enter the number of times to try to reconnect during automatic reconnection.
Load Balance Info
Specifies the load balancing cookie that will be placed in the X.224 Connection Request packet.
Tip
This field is often used for Azure based connections. After importing .rdp files created by the Azure portal, you may find specific load balancing cookies in your configuration.
 Remote Desktop Gateway
The Remote Desktop Gateway page allows you to setup your connection to use a Remote Desktop Gateway.
Gateway Mode
- Use Gateway from parent
The remote desktop gateway configuration from the parent folder will be used. - Use an existing Gateway
Allows you to select an existing remote desktop gateway object. - Specify Gateway settings
Allows you to configure the gateway settings below.
Use Gateway Server
Specifies when to use a Remote Desktop Gateway server.
- Never
Do not use a Remote Desktop Gateway server. - Always
Always use a Remote Desktop Gateway server - On demand
Use a Remote Desktop Gateway server if a direct connection cannot be made to the Remote Desktop Session Host server.
Gateway Server
Specifies the host name of the Remote Desktop Gateway server.
Configuration
Specify the Logon Method for the gateway server.
- Ask for credentials on connect
No credentials configured. Connections that require credentials may prompt the user to enter credentials upon connecting or will fail to connect. - Use from this connection
The same credentials as configured in the Credentials page are used for gateway authentication. - Smart card
Smart card logon is used for gateway authentication. - Specify username and password
Provide a Username and Password. For domain accounts use the syntax "domain\username" - Use an existing credential
Choose an existing credential from the drop-down list. You may also Add a new credential or Edit the selected credential. - Specify a credential name
Enter or choose a credential name.
Note
Assigning existing credentials using the name is recommended when a team of users share the same configuration file. Each user can define a credential with the same name in his own personal and protected document. This makes sharing files across team members very easy while keeping credentials safe. See Work with Personal Credentials in a Shared Document for more information.
 Hyper-V
The Hyper-V page allows you to setup your connection as a Hyper-V host to display the Hyper-V management in the Dashboard and optionally allows you to configure a target instance you want to connect to by default.
Hyper-V Mode
Specifies whether or not the remote host is a Hyper-V mode host.
- This is a standard RDP connection (Default)
The Sessions dashboard pane is shown in the Dashboard panel but not the Hyper-V dashboard pane. - This is a Hyper-V host, show VM instances in dashboard
The Sessions dashboard pane and the Hyper-V dashboard pane is shown in the Dashboard panel.
Note
Use the Connect (Ad Hoc) button in the Hyper-V dashboard pane toolbar to connect directly to the console of a selected instance. There's no need to have any Hyper-V tools or vmconnect.exe as Royal TS seamlessly integrates Hyper-V remote control.
- This is a Hyper-V host, connect to a specific instance
The Hyper-V dashboard pane is shown in the Dashboard panel for the configured instance.
Port
The Hyper-V proxy port. By default, Hyper-V hosts listen to port 2179.
Instance
Enter an instance ID (GUID) or click on the browse button (...) on the right to show the Hyper-V instance picker.
Note
Instance browsing relies on WMI. Ensure that all the necessary firewall ports for WMI are open and that the user account running Royal TS (beware of UAC) or the credentials set in the Remote Desktop connection have local administrative rights on the remote Hyper-V host computer.
Enhanced Session Mode
Local resources, like audio, printers, clipboard, drives, USB devices, etc. can be redirected. Enhanced session mode requires a supported guest operating system, and may require additional configuration inside the virtual machine. See also: Enhanced Session Mode
 Performance
The Performance page allows you to configure various Remote Desktop settings which will directly impact the connection performance.
Connection Speed
On Windows 7/Windows Server 2008R2 you need to set the Connection Speed to LAN in order to enable RemoteFX. On Windows 8/Windows Server 2012 this isn't a requirement anymore but you should set it to LAN speed if you are connecting to the server with a high speed connection. The connection speed setting will affect the bandwidth usage in your RDP connections.
Text Cursor Blinking
If checked, blinking for the text cursor is allowed.
Mouse Cursor Shadow
If checked, the shadow is displayed for the mouse cursor.
Desktop Background
If not checked, no wallpaper is displayed in the remote session.
Font Smoothing
If checked, allows "Clear Type" to render text.
Desktop Composition (Aero)
If checked, allows "Aero" user interface to be rendered.
Show Window Contents while Dragging
If not checked, only the window outline is displayed when a window is moved.
Menu Animations
If not checked, menu and window animations are not displayed.
Visual Styles
If not checked, themes are ignored and not displayed.
DirectX
If checked, DirectX is available in the remote session.
Hardware Acceleration
If checked, hardware acceleration will be used where supported. Overview thumbnails may not work with hardware acceleration enabled.
Bandwidth Detection
Specifies if bandwidth changes are automatically detected.
Note
Font Smoothing and Desktop Composition (Aero) requires Windows Vista/Windows 2008 or later. DirectX requires Windows 7/Windows 2008R2 or later on the client and on the server as well as DirectX capabilities on the client. Bandwidth Detections is new in RDP8 (included since Windows 8/Windows 2012) and is required on both, the client and the server.
Cache Size
Caching and memory management drastically changed in RDP version 8 (when connecting from a Windows 8/Server 20112 to another Windows 8/Server 2012) and will take much more client side memory as with previous RDP versions. The cache size setting allows you to configure how much client side memory Royal TS should use for RDP 8 connections.
 Redirection
The Redirection page allows you to configure device and resource redirection for use in the remote session.
Printers
If checked, redirection of printers is allowed.
Clipboard
If checked, clipboard sharing is allowed.
Smart Cards
If checked, redirection of smart cards is allowed.
Ports
If checked, redirection of local ports (for example, COM and LPT) is allowed.
Devices
If checked, device redirection is enabled.
POS Devices
If checked, redirection of Point of Service device is allowed.
Note
Devices and POS Devices requires Windows Vista/Windows 2008 or later.
Drive Redirection
- No Drives
Redirection of local disk drives is not allowed. - All Drives
Redirection of local disk drives is allowed for all drives. - Specific Drives
Redirection of local disk drives is only allowed for a list of drives.
Audio
Select the audio redirection mode.
- Bring to this computer
All audio from the remote computer is played on this computer. - Leave at remote computer
All audio from the remote computer is played on the remote computer. - Do not play
Audio is disabled on the remote computer.
Record Audio from this Computer
Specifies whether the default audio input device is redirected from the client to the remote session.
Note
Record Audio from this computer requires Windows 7/Windows 2008R2 or later.
 Input
Input
The Input page allows you to configure keyboard behavior and keyboard layout in the remote session.
Accelerator Passthrough
If checked, keyboard accelerators will be passed to the remote session.
Windows Keys Passthrough
If checked, Microsoft Windows key combinations (like Alt-Tab) will be passed to the remote session.
Note
If this option is enabled, windows key combinations will have no effect locally when a remote session is active and has the input focus. You can use certain keyboard shortcuts (for example Ctrl + Shift + N to focus the Navigation panel) to move the input focus back to Royal TS and allow local windows key combinations.
Keyboard Layout
Specify a predefined or custom keyboard layout in your remote session.
Note
This setting will only be effective for freshly logged on sessions. Changing this setting will not affect sessions where a user is already logged on. Ensure you log off the user before you change this setting.
 Program
The Program page allows you to configure the program to be started on the remote server upon connection.
Program
Specifies the program to be started on the remote server upon connection. Replacement tokens are supported.
Working Directory
Specifies the working directory of the start program.
Maximize
Specifies whether the program should be maximized.
 Notes
Notes
The Notes page allows you to enter notes for the selected object with HTML formatting, links and embedded images. You can also configure the notes to be inherited from the parent folder.
Use Notes from the parent folder
When selected, Royal TS will display the notes from the parent folder in the notes panel. This option is not available on the document level.
Tip
To embed images, drag them into the editor using drag & drop.
 Custom Properties
The Custom Properties page allows you to enter and store additional information for the object. Various data formats are available, including protected fields. You can also group properties by using Header.
Inherit from Parent
When checked, the properties configured on the parent folder are shown but are read-only.
Custom Properties
Use the '+' icon to add a header or a Field or multiple fields based on a template. Click on the label to name the field and enter a value. Click the 'Gear' icon to remove a field or header. The 'Gear' icon also shows additional options, like moving a field up or down.
 Custom Fields
The Custom Fields page allows you to enter and store additional information for the object. Custom fields can be used in tasks and templates to inject values from the context connection.
Standard custom fields are also shown in the folder dashboard views and in the properties panel. Protected custom fields can be used to store confidential data (for example when you need an additional password in a task). If you make use of protected custom fields, make sure you encrypt and password protect your document.
Note
Custom fields can be used in Tasks and in the Properties Panel. You can put web page URLs (like an iLO management address) or command lines (such as programs or batch files) in the custom fields and execute them using tasks or directly from the properties panel. Each individual custom field can also be configured to be inherited from the parent folder.
 Parent Folder
The Parent Folder page allows you to view or change the parent folder of the selected object. To move multiple objects to another folder use the parent folder page in bulk-edit mode or use the move to command from the Edit tab (see Working with Connections).
Important
You cannot create connections in the Application document. Moving a folder containing connections to a folder in the Application document will fail.