 Terminal (Rebex)
The Terminal connection based on Rebex can be used to connect to remote computers using Telnet or Secure Shell (SSH). It can also be used to connect to devices using the Serial Port.
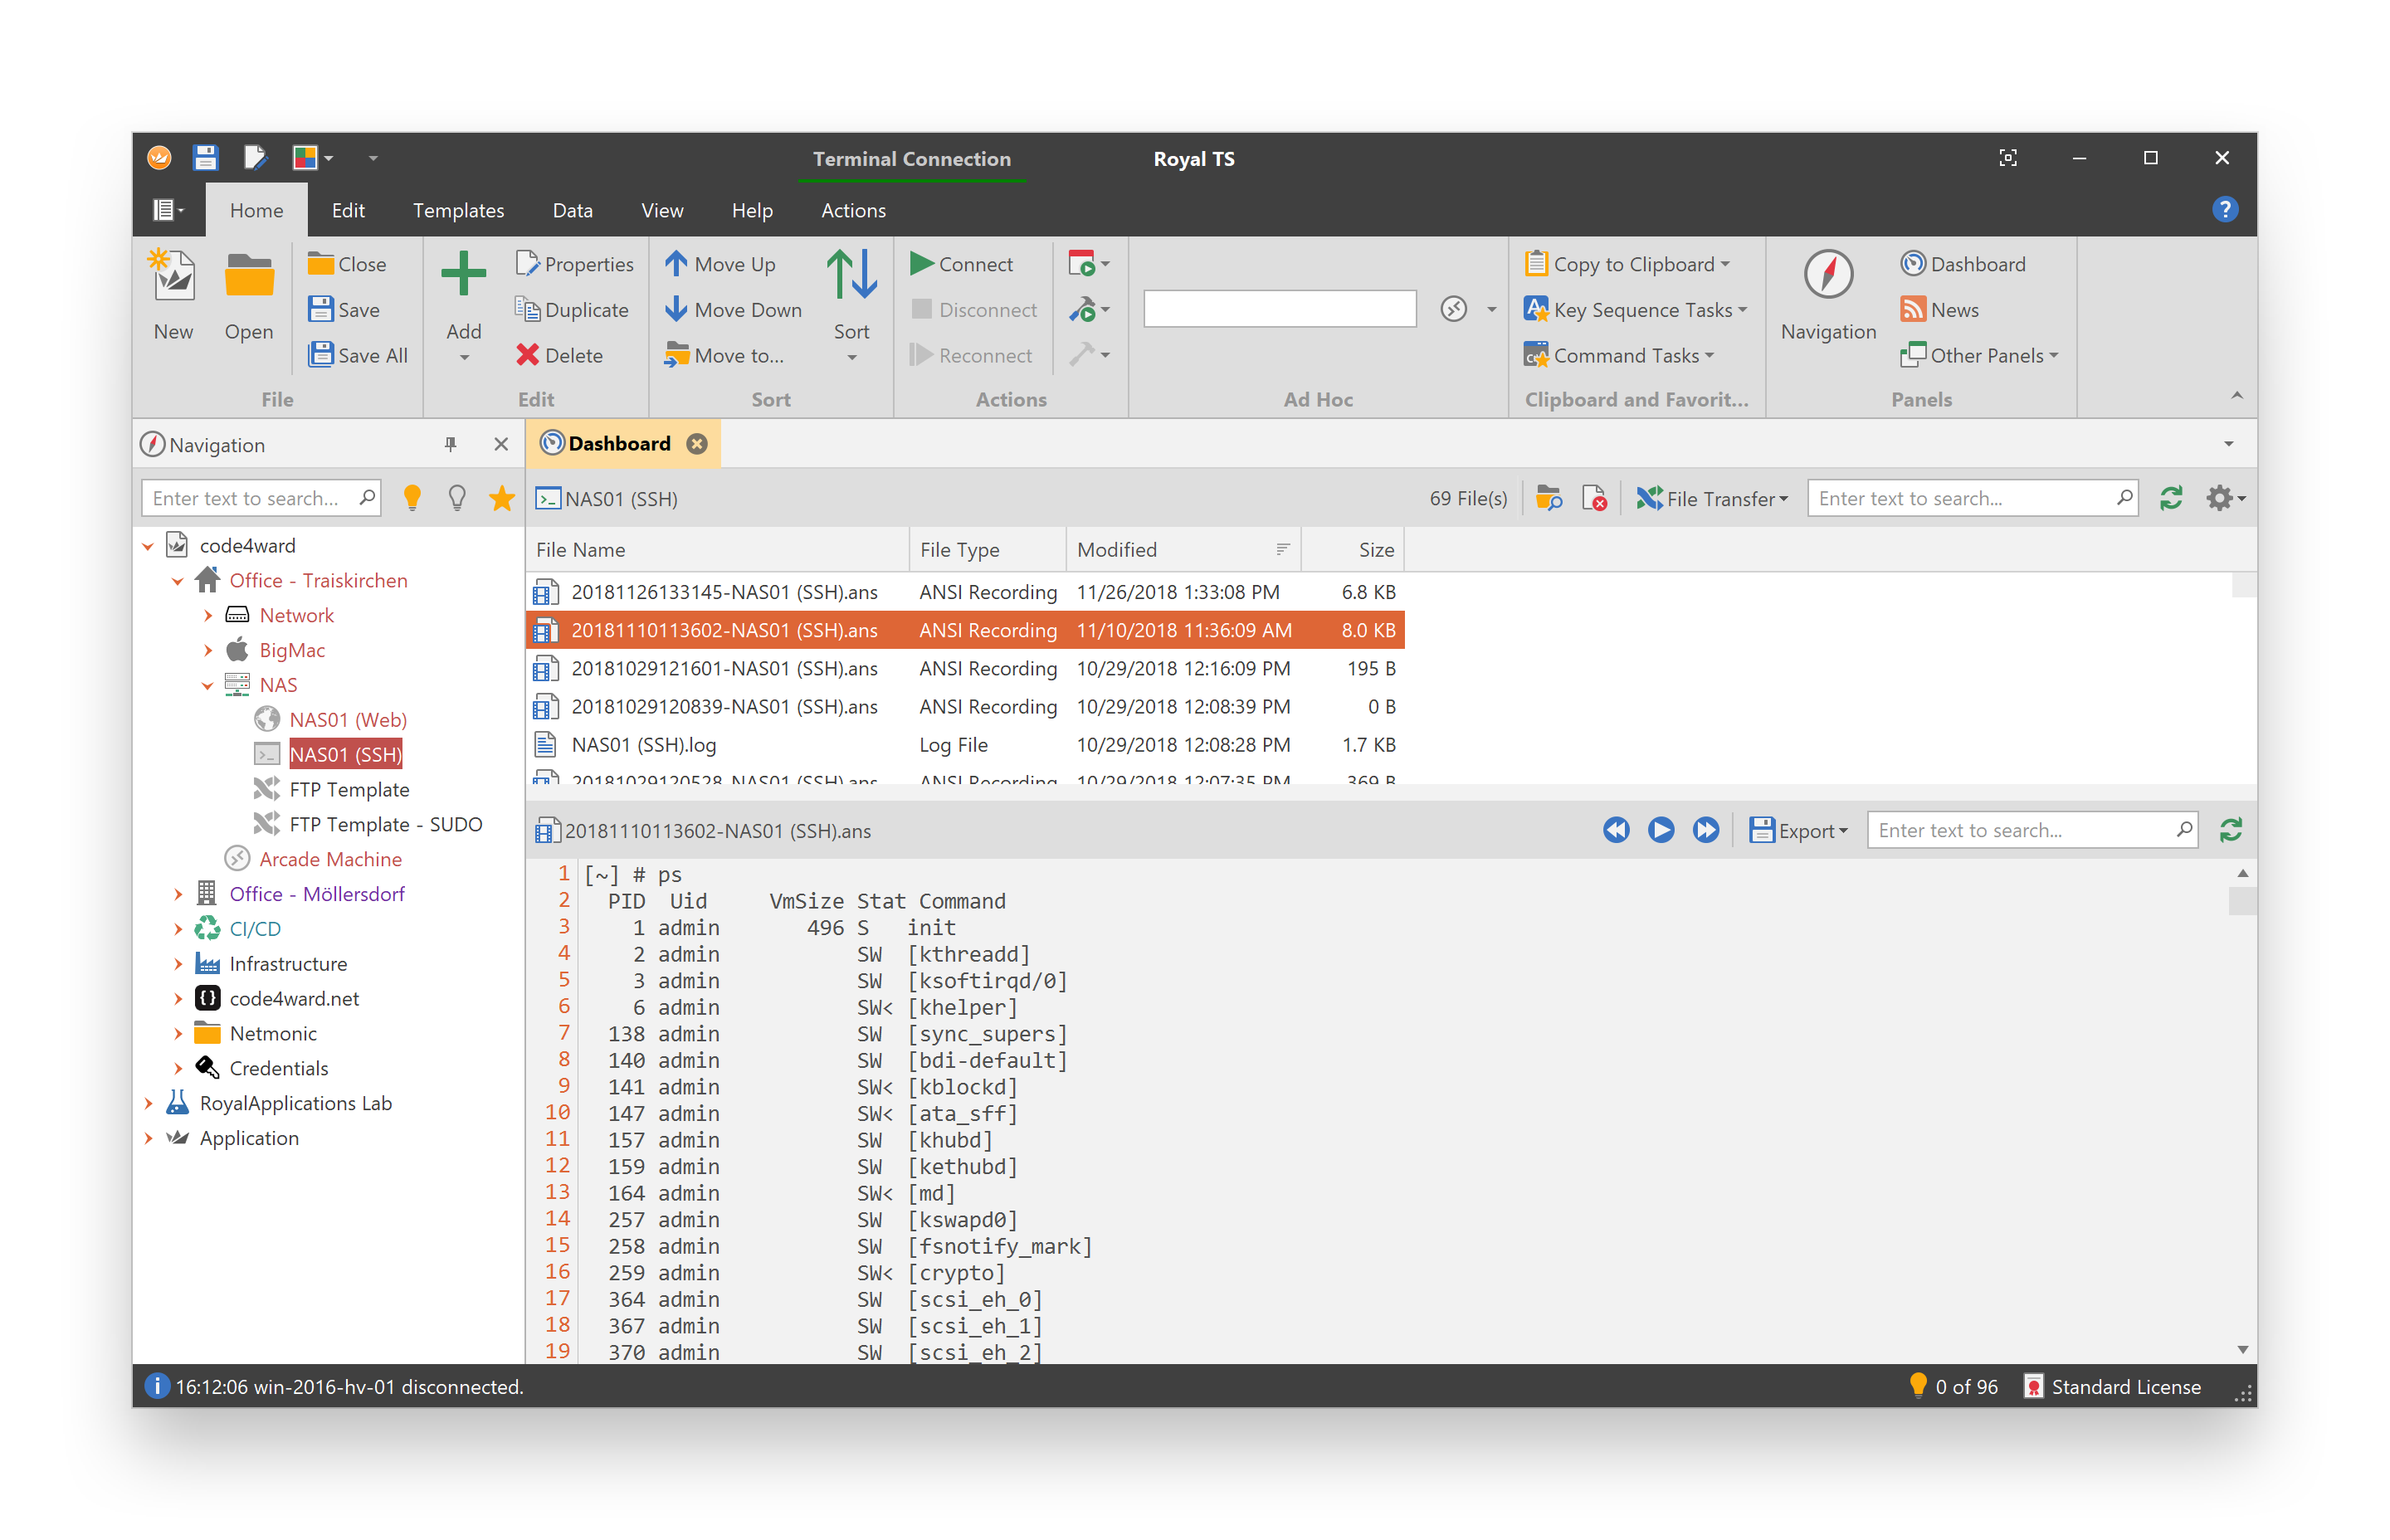
Dashboard
The Terminal Dashboard is shown in the Dashboard panel when you select a Terminal connection based on the Rebex plugin in the Navigation panel. The dashboard will show files with the extension .ans (ANSI recordings) and files with the extension .log. Logging and recording configuration can be found in Logging.
Dashboard Features
- Click the Open in Explorer button to open the folder containing the selected file in Windows Explorer.
- Copy path to clipboard context menu.
- Grid search and customization, including sort, filter and group.
- Delete File allows you to directly delete a recording or log file from the Dashboard.
- Play/Pause, Decrease Speed and Increase Speed buttons are used to control recording playback. Only available for ANSI recordings (.ans files).
- The Export drop down menu allows you to export a recording to a different file format.
- The Options drop down menu allows you to change the ANSI viewer settings: Console Size and Use Smaller Font.
- Click Refresh to refresh the file list.
Dashboard Settings
To configure the application default settings for the included dashboard, open the Plugins Management and click on Dashboard for the Terminal plugin based on Rebex.
To configure individual dashboard settings for a connection, use the Dashboard property page.
Plugin Settings
To configure the plugin settings, open the Plugins Management and click on Settings for the Terminal plugin based on Rebex:
Keep Alive
Configure the interval Royal TS sends a keep alive packet to the remote session (in ms).
Mouse wheel speed
Configure the mouse wheel speed when scrolling back the screen buffer using the mouse wheel
Player size reduction
Configure the font size reduction for the recordings player in the dashboard.
Trigger Delay
The delay in ms to wait until triggers (such as text highlighting) are invoked.
Don't show warning when pasting new lines
If not checked, a warning is shown when you paste text containing new line characters.
Connection Properties
The Terminal (Rebex) Properties dialog is shown:
- for a new Terminal connection by clicking the Terminal menu item in the Add drop down menu in the Edit group on the Home ribbon tab when the Rebex based plugin is set as the default plugin.
- for a new Terminal connection by clicking the More... menu item in the Add drop down menu in the Edit group on the Home ribbon tab and selecting the Terminal (based on Rebex.net) entry from the list of available objects.
- for an existing Terminal connection by selecting a Terminal connection which is configured to use the Rebex based plugin and clicking on the Properties command in the Edit group on the Home ribbon tab.
- as a bulk-edit dialog when multiple Terminal connections which are configured to use the Rebex based plugin were selected in the Folder / Document Dashboard and the Properties command in the Edit group on the Home ribbon tab is clicked. See also: Bulk Operations
 Terminal Properties
The Terminal Connection page allows you to configure basic connection settings, such as host name and the connection type (Telnet, SSH or Serial Port).
Display Name (required)
Enter a display name for object.
Color
Click the color picker button in the display name text box to select a color. In the User Interface settings you can configure to show the color in the navigation tree, the connection tab or as connection border.
Icon
Click the icon picker button next in the display name text box to select and assign a custom icon to the object.
Connection Type
Select one of the supported connection types: SSH Connection, Telnet Connection or Serial Port.
Computer Name (required)
Enter the computer name or the IP address.
Tip
Click on the browse button (...) to open the Entry Editor dialog. The entry editor can be used to search for computers in your network and to add multiple entries for different servers with the same settings at the same time (when supported).
Alternatively, you can also just specify more computer names by separating them with a semicolon for bulk-add operations.
Replacement tokens are supported.
Port
Specify the TCP port for the connection.
Description
Enter a description for the object.
MAC Address
Use this optional field to record the remote computer's MAC address. You can then use this field in templates or tasks, like a wake-on-lan task, for example.
 Display Options
The Display Options page allows you to configure font settings as well as tab appearance settings based on the connection status.
Text
Font
Select the font used for the terminal control.
Font Size
Select the font size used for the terminal control.
Disable Bold and Italic Styles
If checked, bold and italic styles are rendered as regular style.
Font is Bold
If checked, the terminal will print all characters bold.
Blinking Text
The Rebex based terminal connection does not support blinking text display. Specify how blinking text sequences should be displayed in the terminal control.
Font Rendering
- Default (Rebex)
This is the default rendering mode. Depending on the font, character spacing might be bigger than expected. - Compact (PuTTY)
This rendering mode reduces the cell size and mimics the rendering to be more like PuTTY. This rendering mode is more compact and may not work well with all fonts.
Advanced
SGR Mode
SGR Mode is how the terminal control appearance of the "Select Graphics Rendition" sequence (\e[1m).
Auto-Adjust Terminal Size
Enables or displays automatic terminal size adjustment based on the font size.
Show Pre-Authentication Banner
If checked, Royal TS will show a pre-authentication banner.
Show Window Title
If checked, Window Title ANSI sequences are processed and shown in the tab caption or window title.
Scrollback Reset on Display Activity
If checked, scrollback is reset on display activity (when data is received).
Data Received Indicator
If checked, Royal TS will show a * character at the end of the tab caption to indicate that data was received.
Indicator for Inactivity
If checked, the tab caption of the background tab is rendered italic when no data is received for a configured amount of seconds.
 Colors
The Colors page allows you to modify the terminal palette and colors for different text styles.
Color Scheme
- ANSI Palette
The ANSI Palette color scheme (default) allows you to adjust the ANSI palette (Normal Colors and Bright Colors). In this mode, you can also configure custom Text Highlighting using regular expressions. - Monochrome
Selecting Monochrome will not display any color in the terminal. - Custom Palette and Text Colors
The colors returned by the server are ignored but you can specify your own colors for different text styles.
Normal and Bright Colors
Adjust the ANSI color palette for individual colors.
Cursor Colors
Configure the background color of the cursor and the corsor appearance. You can also enable or disable cursor blinking and configure the blinking interval of the cursor.
Text Highlighting
Configure regular expression based highlighting rules.
Note
Text highlighting is only available in ANSI Palette color scheme.
Palette
The drop-down button allows you to apply built-in or custom terminal color schemes. It also allows you to export and manage terminal palettes for easy sharing.
Tip
You can read more about this topic here
 Credentials
The Credentials page allows you to assign a credential to the object. You can specify username and password, assign a predefined credential or you specify a credential by name (ideal when you share your configuration). You can also use the credentials defined in the parent folder.
Do not use any credentials
When selected, no credentials are configured for the object. Connections that require credentials may prompt to enter credentials or fail to connect.
Use credentials from the parent folder (not always available)
When selected, Royal TS will look for a configured credential in the parent folder.
Note
Not available for Royal Server objects, Secure Gateway objects, Remote Desktop Gateway objects and Key Sequence Tasks
Use from this connection (not always available)
When selected, the username and password is used from the context connection object.
Specify username and password
When selected, a username and password can be provided. For domain accounts use the syntax "domain\username" (without the quotes).
Use an existing credential
When selected, assign an existing credential to the object using the drop-down list. Use the add button to add a new credential. Use the edit button to edit the selected credential.
Tip
The drop-down list supports sorting and filtering "as you type" to easily find the correct credential.
Specify a credential name
When selected, enter or choose a credential name you want to assign to the object during connect-time.
Note
Assigning a credential by name is recommended when a team of users share the same configuration file. Each user can define his own credential as long as it is using the same name and saves the credential in his own personal and protected document. This makes sharing files across team members very easy while keeping credentials safe.
Omit Domain
When checked, Royal TS will omit the domain portion of the username (domain\username or username@domain).
Note
The Omit Domain checkbox is not available for all object types!
Automatic Logon
When checked, Royal TS will use the credentials to log on to the connection automatically. This setting applies only to connection types supporting automatic logon and is ignored if a connection doesn't support automatic logon.
Note
To access the configured credentials through replacement tokens (for example in Auto Fill or Key Sequence Task configurations), use the replacement tokens \(EffeciveUsername\) and \(EffectivePassword\).
Edit Source
Opens the properties dialog of the source object for the configuration. This button will only be available when the object is configured to use the parent configuration.
See also: Working with Credentials, Credential, About shared documents
Private Key File
Save Mode
- Path to Private Key Fie
- Embed Private Key File
Private Key File
Specify the full path to the private key file or click on browse button to browse for the file.
Passphrase
Enter a passphrase.
 Tasks
Tasks
You can specify a task to be executed before a connection is established and after it has been disconnected. For example: establish a VPN connection before you connect and close it after disconnect.
Connect Task
Do not execute a task
Royal TS will not execute a command task when a connection is established.
Use task from parent folder
Royal TS will look for a configured connect task in the parent folder. This option is not available on the document level.
Use an existing task
Choose a command task from the drop-down list. Use the add button to add a new credential. Use the edit button to edit the selected credential.
Note
The drop-down list supports sorting and filtering "as you type" to easily find the task you are looking for.
Specify a task name
When selected, enter or choose a task name you want to assign to the object during connect-time.
Note
Assigning a task by name is recommended when a team of users share the same configuration file. Each user can define his own task as long as it is using the same name and saves the task in his own personal and protected document. This makes sharing files across team members very easy.
Wait for connect task completion
If checked, Royal TS will wait for the selected task to finish before the connection will be established.
Execute for first connection in folder
If checked, the task will only be executed if no other connection in the same folder is active.
Note
This setting might be useful if you need to setup a VPN connection. Put all your connections which require you to setup this VPN in one folder and Royal TS will establish the VPN connection only for your first connection.
Abort when connect task fails
If checked, the connection will not be established when the configured task fails and returns an Exit Code other than 0.
Disconnect Task
Do not execute a task
Royal TS will not execute a command task when a connection is disconnected.
Use task from parent folder
Royal TS will look for a configured disconnect task in the parent folder. This option is not available on the document level.
Use an existing task
Choose a command task from the drop-down list. Use the add button to add a new credential. Use the edit button to edit the selected credential.
Note
The drop-down list supports sorting and filtering "as you type" to easily find the task you are looking for.
Specify a task name
When selected, enter or choose a task name you want to assign to the object during disconnect-time.
Note
Assigning a task by name is recommended when a team of users share the same configuration file. Each user can define his own task as long as it is using the same name and saves the task in his own personal and protected document. This makes sharing files across team members very easy.
Wait for disconnect task completion
If checked, Royal TS will wait for the selected task to finish before the connection will be disconnected.
Execute for last connection in folder
If checked, the task will only be executed if it is the last active connection in the folder.
Note
This setting might be useful if you need to setup a VPN connection. Put all your connections which require you to setup this VPN in one folder and Royal TS will disconnect the VPN connection after the last connection is disconnected.
See also: Working with Tasks, Command Task
 Key Sequence
The Key Sequence page allows you to configure a sequence of key strokes (simulating keyboard events) to be sent to the connection after the connection has been established.
Do not send a key sequence
This is the default value. If selected, no key sequence is sent to the remote session after connect.
Use key sequence task from parent folder
Royal TS will look for a configured key sequence task in the parent folder. This option is not available on the document level.
Specify a key sequence
If selected, a key sequence can be specified for this connection.
Note
Use the fly-out button to the right to show a list of available replacement tokens and special key commands. Use the WAIT command anywhere in the sequence to delay the sequence.
Examples for Key Sequences:
- A group policy is set to show a message whenever a user is attempting to log on interactively. Create a key sequence "{WAIT:1000}{ENTER}" which will wait 1 second (1000ms) after successfully connected to the remote desktop session and sends the ENTER key to the remote session to confirm the message.
- A web page connection to a flash based application which requires you to log on using a username and password can be configured to send the appropriate key sequence after the connection has been established.
Use an existing key sequence task
If selected, a key sequence task can be specified for this connection.
Note
If a key sequence is in progress, do not interact with Royal TS or any other application after you connect. The status bar message indicates when a key sequence is in progress and when it has finished.
Specify a key sequence task name
When selected, enter or choose a key sequence task name you want to assign to the object during connect-time.
Note
Assigning a task by name is recommended when a team of users share the same configuration file. Each user can define his own task as long as it is using the same name and saves the task in his own personal and protected document. This makes sharing files across team members very easy.
Edit Source
Opens the properties dialog of the source object for the configuration. This button will only be available when the object is configured to use the parent configuration.
 Window Mode
The Window Mode page allows you to control where the connection should open. Most connection types support Main Window (Embedded) mode and External Window mode. Remote Desktop connections, for example, additionally support External Window (Full Screen) mode.
Open connection in
- Main Window (Embedded)
When selected, the connection will be embedded in the main window. - External Window When selected, the connection will open in an external window.
- External Window (Full Screen)
When selected, the connection will open in an external window in full screen mode (no window title bar and borders).
Use Multiple Monitors
If checked, the connection will use all monitors if connected in Full Screen mode or if the connection is changed to use Full Screen mode while connected.
Note
This option is only available for connections supporting full screen and multiple monitors (like Remote Desktop).
Don't show the connection bar
If checked, the connection bar will not be shown in full screen mode.
Note
This option is only available for Remote Desktop connections. To display the connection bar, use the Ctrl + Alt + Home keyboard shortcut.
External Window Settings
The following settings can be configured when the window mode configuration is set to external window.
Screen
- Remember Screen
Royal TS remembers which screen the connection was on after you've disconnected the connection and tries to open the external connection window on the same screen the next time you connect. - Screen 1 ... 9
Choose on which screen you want the external connection to be opened.
Note
Setting the Screen configuration to a screen which is currently not available on your computer will be ignored as long as the screen is not available. A common scenario for this is, working with the same file on a laptop computer with only one screen and a workstation with multiple screens connected. Setting connections to open on the Screen 3 will open on the main display on your laptop while the same connection will open on your workstation on Screen 3.
Position
- Remember Position
Royal TS will remember the last window position after you've disconnected the connection and tries to open the external connection window at the same position the next time you connect. - Custom Left and Top
Specify the left and top coordinates (in pixels) where the external connection window should be positioned.
Size
- Remember Size
Royal TS will remember the last window size after you've disconnected the connection and tries to open the external connection window with the same size the next time you connect. - Custom Width and Height
Specify the width and height (in pixels) of the external connection window. - Maximize
The external connection window will be maximized. - Preferred Size
The external connection window will use the sized configured in the connection. This setting will only be effective for connection types supporting a custom client size (for example the Desktop Size in the Display Options of a Remote Desktop Connection). If a connection type doesn't support a custom client size the setting will be ignored and the external window will be maximized.
Minimize Main Window
When checked, Royal TS will minimize the main window after the connection was established.
Open Display Properties
Opens the display properties control panel. With the control panel you can identify your screens.
 Dashboard
The Dashboard page allows you to setup the default dashboard behavior for this connection. Dashboards are updated when a selection has changed. By default, the dashboard tab is shown and activated for inactive connections.
Use the plugin default settings
If selected, Royal TS will use the plugin default settings for the dashboard. You can change the plugin default settings by clicking on the Settings... button. Changes to the plugin default settings will affect all connections using the same plugin and the default settings. See also: Plugins
Use connection specific settings
If selected, Royal TS allows you to configure the dashboard settings for the connection.
 Secure Gateway
The Secure Gateway page allows you to configure a Secure Gateway object for supported connections or choose to use a Secure Gateway configuration from the parent folder.
Use Secure Gateway from the parent folder
If checked, Royal TS will look for a configured Secure Gateway in the parent folder. This option is not available on the document level.
Gateway Usage
- Never
The Secure Gateway is never used and Royal TS will directly connect to the remote computer. - Always
The Secure Gateway is always used and Royal TS will tunnel all communication to the remote computer through the gateway. - On Demand
The Secure Gateway will be used if the target machine cannot be reached directly.
Direct Connect (No Secure Gateway)
This is the default value. If selected, no Secure Gateway is used and Royal TS will directly connect to the remote computer.
Specify a Secure Gateway object
The selected Secure Gateway object is used for supported connections.
Note
A Secure Gateway is a component included in Royal Server and can be used to connect through an SSH tunnel (port forwarding).
Edit Source
Opens the properties dialog of the source object for the configuration. This button will only be available when the object is configured to use the parent configuration.
See also: Introducing Royal Server
 Active Plugin
The Active Plugin page allows you to setup which plugin should be used for this connection.
Use Application Default Setting
If checked, the application default plugin is used for this connection. Clear the check box to configure a specific plugin for this connection.
Click on Open Plugin Management to change the default plugin for this connection type.
Active Plugin
Select the plugin which should be used for this connection.
Information
Click on the information button to open the selected plugin information page.
Settings
Click on the settings button to open the selected plugin settings page.
Open Plugin Management
Click to open the Plugin management dialog.
See also: Plugins
 Advanced
The Advanced page allows you to configure advanced Terminal settings.
Encoding
Select one of the supported encoding settings.
Terminal Type
Select one of the following terminal types: Ansi (Default), Wyse 60 compatible, Pick compatible.
Auto Wrap
Switch auto wrap on, off or to behave like in DOS.
Backspace Wrap
Switch backspace wrap on, off or to behave like in DOS.
SSH Remote Command
In SSH, you don't have to run a general shell session on the server. Instead, you can choose to run a single specific command (such as a mail user agent, for example). Replacement tokens are supported.
Local Echo
Enable or disable local echo.
Disable Bell
If checked, the bell action (beep) is disabled.
Force Non-Destructive Backspace
If checked, Royal TS will treat incoming destructive backspace characters (7F) as non-destructive backspace characters (08)
Ignore Substitute Character
If checked, Royal TS will ignore substitute characters (1A), otherwise Royal TS will replace each substitute character with a question mark.
Implicit CR in LF
If checked, Royal TS implies a carriage return in every received linefeed.
 Security
The Security page allows you to adjust security settings and allowed algorithms.
General
Authentication Method
Select the authentication method to use.
Note
You may need to switch to Keyboard Interactive authentication when your servers requires multi-factor authentication (MFA).
Fingerprint
Contains the stored fingerprint of the remote SSH host. Click on the button with the check mark to verify the fingerprint.
Fingerprint Mismatch Warning
If checked, Royal TS will display a warning if the fingerprint doesn't match.
Ciphers
Use drag and drop, ALT + UP and ALT + DOWN keys or use the up and down buttons in the cipher header bar to reorder the list of algorithm. Checking/unchecking an algorithm will enable/disable it.
You can configure the following ciphers:
- Encryption Key Algorithms
- Host Key Algorithms
- Key Exchange Algorithms
- Mac Algorithms
Warning
Ciphers with a warning icon are considered weak (insecure).
 Input
Input
The Input page allows you to configure keyboard behavior in the remote session.
Keyboard
Terminal Name
Default is xterm. Allows you to set a custom terminal name.
Function Keys
Specify how to encode function keys such as F1-F20, INS, Del, Home, etc.
Home and End Key
Specify the behavior of the Home and End key.
Note
In Standard mode the, the behavior is determined by the selected Function Keys mode.
Backspace Sequence
Specify the backspace key sequence 0x08 (^H) or 0x7F (^?).
New Line Sequence
Specify the new line sequence CR or CRLF for outgoing data.
Cursor Key Mode
Specify the initial cursor key mode Normal or Application.
Ignore Remote Cursor Key Mode
If checked, Royal TS will ignore cursor key mode changes requested by the remote server.
Keyboard Scrolling
If checked, the following keyboard shortcuts are supported for scrolling:
- SHIFT + PAGE UP
- SHIFT + PAGE DOWN
Other
Mouse Paste Enabled
Specify the initial mouse paste mode. You can easily switch on or off mouse paste from the Actions tab while connected.
Selection Mode
Specify the initial selection mode. You can easily switch on or off mouse paste from the Actions tab while connected.
Scrollback Lines
Specify the number of lines kept in the scrollback buffer. The maximum value is 99999.
Character Substitution
If checked, characters like smart quotes, ticks and long dashes are replaced with regular quotes, ticks and dashes.
Direct Send to Server for Key Sequences
If checked, key sequence tasks are sent to the server directly instead of simulating keyboard input.
Character Paste Delay
If checked, character paste delay will be enabled. You can quickly enable or disable character paste delay using the ribbon's actions tab while connected.
Character Paste Delay in ms
The time span in ms between each character when pasted from the clipboard.
Line Paste Delay
If checked, line paste delay will be enabled. You can quickly enable or disable line paste delay using the ribbon's actions tab while connected.
Line Paste Delay in ms
The time span in ms between each line when pasted from the clipboard.
 Serial Port
The Serial Port page allows you to configure the port settings to connect to devices using RS232.
Port Name
Set the port for communications.
Important
The Port Name must begin with COM.
Handshake
Set the handshaking protocol for serial port transmission of data.
Baud Rate
Set the speed of the serial port communication.
New Line
Set the value that represents the end of the line. Default is \n.
Data Bits
Set the standard length of data bits per byte.
Parity
Set the parity checking protocol.
Stop Bits
Set the standard number of stop bits per byte.
Read Timeout
Set the number of milliseconds before a time-out occurs when a read operation does not finish.
Write Timeout
Set the number of milliseconds before a time-out occurs when a write operation does not finish.
 Proxy Settings
The Proxy Settings page allows you to configure a proxy server used to connect to the remote server.
Proxy Mode
- No proxy (direct connect): (No proxy server will be used to connect to the remote server)
- Socks 4
- Socks 4a
- Socks 5
- HTTP Connect
Proxy Server
Specify the proxy server name (FQDN) or IP address to use.
Port
Specify the proxy server port to use.
Credential Mode
Do not use any credentials
When selected, no credentials are configured for the object. Connections that require credentials may prompt to enter credentials or fail to connect.
Use credentials from the parent folder (not always available)
When selected, Royal TS will look for a configured credential in the parent folder.
Note
Not available for Royal Server objects, Secure Gateway objects, Remote Desktop Gateway objects and Key Sequence Tasks
Use from this connection (not always available)
When selected, the username and password is used from the context connection object.
Specify username and password
When selected, a username and password can be provided. For domain accounts use the syntax "domain\username" (without the quotes).
Use an existing credential
When selected, assign an existing credential to the object using the drop-down list. Use the add button to add a new credential. Use the edit button to edit the selected credential.
Tip
The drop-down list supports sorting and filtering "as you type" to easily find the correct credential.
Specify a credential name
When selected, enter or choose a credential name you want to assign to the object during connect-time.
Note
Assigning a credential by name is recommended when a team of users share the same configuration file. Each user can define his own credential as long as it is using the same name and saves the credential in his own personal and protected document. This makes sharing files across team members very easy while keeping credentials safe.
 Logging
The Logging page allows you to configure ANSI session recordings and logging. Recordings as well as log files can be viewed using the Dashboard.
Path
Specify a path where the recordings should be stored. Click on the browse button (...) to browse for a folder.
Open in Explorer
Click on the button to open the configured folder.
Create Sub-Directory with Connection Name
If checked, Royal TS will create a sub directory for using the connection name in the configured path.
Always Prompt for Output Path
If checked, Royal TS will always prompt for path and file name when you click on Record Session on the Actions tab.
Auto-Start Recording when Connected
If checked, Royal TS will automatically start the recording as soon as the session is connected.
Logging
Enable or disable logging.
Logging Level
Use the drop down list to select how much information to log.
 Notes
Notes
The Notes page allows you to enter notes for the selected object with HTML formatting, links and embedded images. You can also configure the notes to be inherited from the parent folder.
Use Notes from the parent folder
When selected, Royal TS will display the notes from the parent folder in the notes panel. This option is not available on the document level.
Tip
To embed images, drag them into the editor using drag & drop.
 Custom Properties
The Custom Properties page allows you to enter and store additional information for the object. Various data formats are available, including protected fields. You can also group properties by using Header.
Inherit from Parent
When checked, the properties configured on the parent folder are shown but are read-only.
Custom Properties
Use the '+' icon to add a header or a Field or multiple fields based on a template. Click on the label to name the field and enter a value. Click the 'Gear' icon to remove a field or header. The 'Gear' icon also shows additional options, like moving a field up or down.
 Custom Fields
The Custom Fields page allows you to enter and store additional information for the object. Custom fields can be used in tasks and templates to inject values from the context connection.
Standard custom fields are also shown in the folder dashboard views and in the properties panel. Protected custom fields can be used to store confidential data (for example when you need an additional password in a task). If you make use of protected custom fields, make sure you encrypt and password protect your document.
Note
Custom fields can be used in Tasks and in the Properties Panel. You can put web page URLs (like an iLO management address) or command lines (such as programs or batch files) in the custom fields and execute them using tasks or directly from the properties panel. Each individual custom field can also be configured to be inherited from the parent folder.
 Parent Folder
The Parent Folder page allows you to view or change the parent folder of the selected object. To move multiple objects to another folder use the parent folder page in bulk-edit mode or use the move to command from the Edit tab (see Working with Connections).
Important
You cannot create connections in the Application document. Moving a folder containing connections to a folder in the Application document will fail.